Tuesday, September 8, 2015

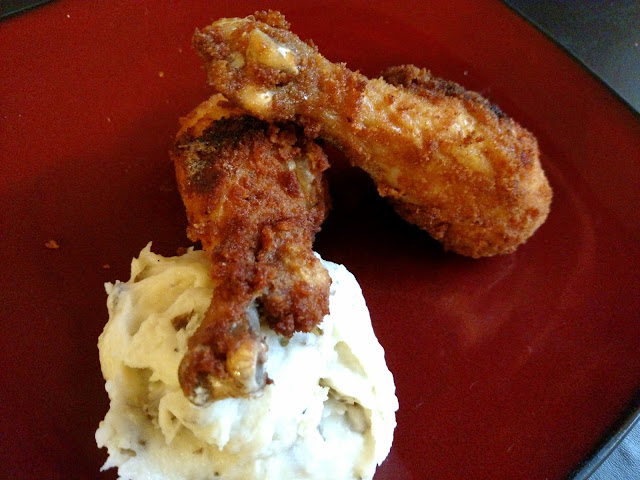
Coconut Flour Fried Chicken (Gluten Free)


Ingredients

5 lbs. chicken legs
4 eggs
2 C coconut flour
4 tsp salt
2 tsp pepper
2 tsp garlic powder
2 tsp oregano
2 tsp paprika
oil for cooking


Instructions

In large bowl, combine coconut flour, salt, pepper, garlic powder, and paprika.
Beat eggs in small bowl.
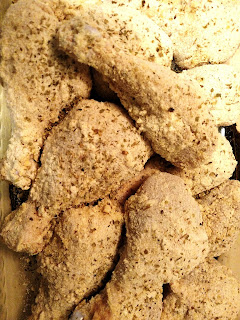
Take chicken legs and coat them in egg, then toss in flour mixture.
Top the breaded chicken with oregano.
Heat 3 1/2 in of oil in pot using medium high heat.
In batches, cook chicken in oil, turning every 2-3 min until cooked through. (Breading should be golden brown.)


Friday, September 4, 2015

Bacon Chicken Casserole (Gluten Free)


Prep Time: 30mins | Cook Time: 30mins |Total Time: 60mins | Serves 4

Ingredients

3 chicken breasts
1 head cauliflower
2  1/2 C shredded mild cheddar cheese
1 bundle green onions, chopped
1/2 lb bacon
1 clove garlic, minced
1/4 C whole milk
2 T unsalted butter
1/2 tsp garlic powder
salt and pepper to taste


Instructions
  1. Preheat oven to 350 degrees. 
  2. Remove stem from cauliflower and roughly chop.
  3. In microwave safe bowl, add cauliflower, milk, butter, and garlic powder. 
  4. Microwave on high for 7 minutes. Leave in microwave until step 8.
  5. Cut bacon into 1 in. strips and cook in large skillet until crispy. Set aside. (I set aside a little bacon grease in the refrigerator to use to grease my baking dish.)
  6. Cube chicken and cook in bacon grease. Set aside.
  7. In large bowl, mix 2 cups of cheese, chopped onions, bacon, and chicken.
  8. Remove cauliflower from microwave and stir well, then add to cheese mixture.
  9. Grease a 9x13 baking dish. (mmm bacon...)
  10. Pour mixture into baking dish and top with remaining 1/2 cup of cheese.
  11. Cover with foil and bake for 30 min. 
  12. Allow to cool and enjoy!

Wednesday, September 2, 2015

Spaghetti Squash with Bacon and Asparagus (Gluten Free)


Serves 4 | Prep time: 15 min. | Cook time: 60 min.

Ingredients:

3-4 lb. Spaghetti squash
1 lb. Bacon cut into 1 in. pieces.
4 C Asparagus cut into 1 in. pieces.
1 Small onion, diced
1 C Water
1 C Chicken broth
Pinch of salt
Pinch of garlic powder
Parmesan cheese (optional)


Instructions:

Preheat oven to 375 degrees.
Cut spaghetti squash in half lengthwise and remove seeds.
In a 9x13 baking dish, add water.
Place both halves of squash face down in baking dish.
Bake for 45 min.

Cut your bacon and asparagus into 1 in. pieces.
In large skillet, cook bacon until crispy.
Remove with slotted spoon and set aside.
Cook asparagus and onion in bacon grease. Add salt and garlic powder.
When asparagus is cooked, remove with slotted spoon and set aside.

Add chicken broth to bacon grease. (Do this slowly to avoid splashing.)
Stir well, using the spoon to scrape the bottom of the skillet.
Keep on low heat for 5 min, stirring occasionally.
Remove from pan and set aside.

When spaghetti squash is finished baking, remove from oven.
Turn the halves face up.
Using a fork, shred the flesh of the squash.


Add squash, bacon, asparagus, and onion to skillet. Mix well.
Add broth to mixture in small amounts. Stirring it in well.
(Taste as you add, as sometimes the bacon will give more grease and can alter the flavor. I usually use about 3/4 of the broth.)

Serve immediately. (It tastes amazing topped with parmesan cheese as well!)
Monday, August 17, 2015

Cream Cheese and Bacon Stuffed Chicken (Gluten Free)


Serves 4 | Prep time: 20 min | Cooking time: 45 min

4 large chicken breast
1/2 lb bacon
8 oz of chive and onion cream cheese
1 C shredded mild cheddar
4 TBS unsalted butter
1 small can chopped green chiles
1/2 C chopped peanuts
pinch salt and pepper

Preheat oven to 350°. Cover cookie sheet with aluminum foil.

Cut bacon into 1 in. pieces and place in large skillet on medium high heat. Stir occasionally until fully cooked through. When finished, set aside to cool.

While bacon is cooking, mix  cream cheese and shredded cheddar in a small bowl. Set aside.

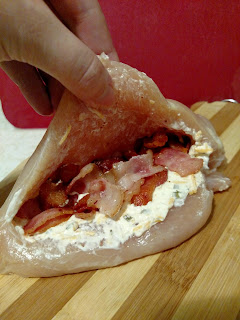
Put your chicken breast on a chopping board and, with your hand flat on top of it, use a sharp knife to slice into one side of the breast, starting at the thicker end and ending at the thin point. Be careful not to cut all the way through to the other side. Repeat with the remaining chicken breasts.


Take a heaping spoonful of cream cheese mixture and spread evenly along the bottom of the pocket in each chicken breast. You should use roughly half of the mixture by the time you finish the last piece.


Once bacon has cooled enough to touch without burning your hand, layer on top of cream cheese inside of the pocket.

Use remainder of cream cheese mixture to spread an additional layer on top of bacon.


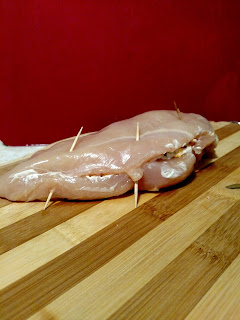
Pull the top part of the chicken breast forward to close the pocket, securing with toothpicks.

Place chicken breasts on prepared cookie sheet and season with salt and pepper.


Melt butter in microwave using 30 second increments. Brush half of the butter over the chicken breasts.

Bake chicken at 350° for 30 minutes.

While chicken is baking, chop peanuts.

Add green chiles and half of the peanuts to remainder of melted butter and stir
.
When chicken is done baking, remove from oven and top with green chile mixture.

Sprinkle the last of the peanuts over the green chile mixture.

Bake chicken at 350° for additional 15 minutes.

Serve immediately.


Saturday, June 14, 2014

Delicious Cupcakes for Under $10

Now that we are more adjusted to having our little girl at home, I've had a moment to work on a simple tasty treat! These cupcakes are delicious and moist, and surprisingly enough, they come from a boxed cake mix!


The Cupcakes: Yields 12 Servings

2/3 C Milk or Buttermilk
1/4 C Butter (softened)
2 Eggs
1/2 Box of Betty Crocker Cake Mix (I used Devil's Food and Vanilla in two separate batches.)


  • Preheat oven to 350 degrees.
  • In large bowl, beat cake mix, milk, butter, and eggs on low until mixture is smooth.
  • Let mixture sit while lining muffin tin.
  • Fill to half way point (the mixture will rise to the top while baking)
  • Bake 15-17 minutes. 
  • Check with tooth pick. When the pick comes out clean the cupcakes are done.
  • Allow to cool completely before decorating.


The Icing:

1 Can Betty Crocker - Rich & Creamy - Milk Chocolate 
1 Can Betty Crocker - Rich & Creamy - Cream Cheese
Green Food Coloring 

(Add coloring to cream cheese icing, stirring consistently, until desired shade is reached. I prefer the pale green color because it makes for a nice contrast with the brown icing.)


Decorating:

1 Piping Bag
1 Size M Star Tip

  • Cut end of piping bag just enough to fit the tip in. 
  • Place tip inside bag, and slide through small hole until firmly in place.
  • Lay piping bag on a flat surface and pull open so it looks like this:


  • With small spoon, take green icing and place into bag, face down. Make sure that you push the spoon as close to the tip as possible, and scrape the icing off on the portion of the bag touching the flat surface. 
  • Continue to add green icing like this to the half way point of the bag.
  • With a different spoon, take chocolate icing and place into bag, face up. Again, push the spoon as close to the tip as possible, and scrape the icing off on the top portion of the bag. The colors will mix a bit, and that is okay, as we want them to seamlessly change color as we decorate.
  • Continue to add chocolate icing like this to the half way point on the bag.
  • Pick up bag with tip facing down over a small bowl.
  • Twist the top of the bag to prevent air pockets.
  • Gently squeeze bag and allow icing to go into bowl until both colors are seen, and air pockets are no longer coming out.


Decoration:


This style of decoration is very simple. Start in the center of the cupcake, and make tight swirls outward.

For this style, you do the exact opposite. Start piping in a spiral inwards, slowly building upwards. To finish, give a small extra squeeze to the piping bag and release pressure as you pull straight up.

Garnish:

Vegetable Peeler
1 Hershey's Chocolate Bar

Over a cupcake, slowly drag vegetable peeler along the short edge of the chocolate bar. For more curling, make sure the chocolate bar is room temperature. For less curling, place chocolate bar in refrigerator 10 minutes prior to garnishing cupcakes.


And there you have it! Super easy and delicious cupcakes for under $10!

Friday, October 4, 2013

A Month of Meals for Under $150


As I mentioned in my last post, with my little girl's upcoming arrival right around the corner, I began searching for ways to make life easier once she gets here. Let's face it, I probably will be the equivalent of a zombie for awhile. That being said I likely won't be up to very much cooking.

So after getting together with my mother and two sisters, we prepared 33 meals that I could freeze for after my little one arrives. Most of these meals only require being tossed in the oven or the microwave for a short time, with little to no prep required. It's a new mom's dream! (Or a busy mom, or anyone who would prefer to have a decent meal after work with minimal effort, really!)

Welcome to Tasty Bites for the Hungry Family!

It's always an exciting day when you decide to start a new blog. I just wanted to give you a little background as to why I'm starting this with a few of my family members.